Progress Log 2012/2013
This is the progress log for 2012/13 of my (rather slow) build. I thought it would be quicker now that I have retired, but there seems to be less hours available per day!
September 2012
The order
Ordered the bench-work from Model
Railway Solutions on the 7 September after finally deciding on a layout - see my initial very basic
design Train Room Map (PDF)
December 2012
The sales
Bought some laminate flooring, underlay and paint in the sales from my local DIY retailer, Wickes
Shutters
Ordered shutters for the window from The California Shutter & Blind Company Limited for £355.10. Estimated delivery
7-8 weeks
January - March 2013
Room preparation
Decorated train room and in March the shutters arrived.
Laid laminate flooring - was relaid by a friend (thanks Mike) as I had made an error in the
interlocking.
Now just waiting for the bench-work to arrive which was ordered September 7 2012.

Click on picture for full size 9.1MB photo.
Retired
Finally retired from work in March taking the last couple of weeks as holiday.
Busy filling out forms and emails for working out pension.
Very little work done. Bought some wood and ply.
April 2013
Bench-work
The bench-work has arrived and I have started putting it together.
Missing bits
Missing a few bits: adjustable feet, ends for one 3 foot section and one complete set of helix.
The missing feet and the missing two baseboard ends finally arrive.
Still no response to the missing helix.
May - June 2013
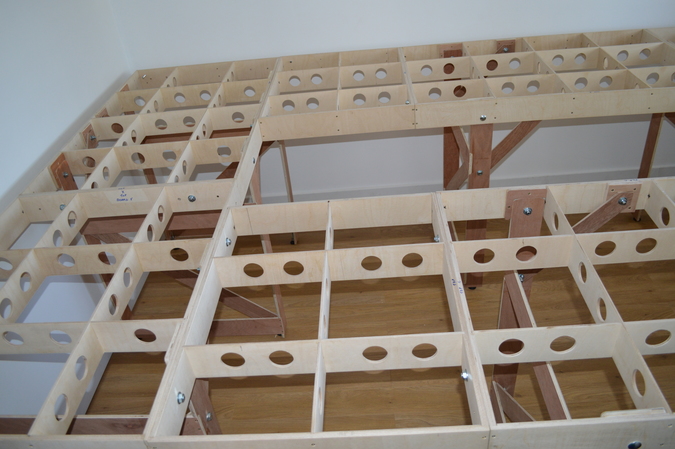
Fitted bench-work
I had forgotten to allow for the radiator when I ordered the bench work so had to cut down the three
foot benches to 20 inches. My error! You can see this in the forefront and at the back of the picture
below.
Click on picture for full size 8.6MB photo.

Click on picture for full size 8.2MB photo.

Click on picture for full size 10.0MB photo.
You can see the adjustable feet at the bottom of the legs. That took a long time to level the whole room!!

Click on picture for full size 8.9MB photo.
Backboard
Built and attached backboards 18 inches round two wall and dropped to 12 inches in front of the window.
Used wood primer and under coated white on both sides. Painted the front "Blue Sky" as an
interim measure.
The corner back panels taken in August as I forgot to take any pictures!

Click on picture for full size 8.4MB photo.
Planning
Spent a lot of time planning and reading up on specifications. I came up with the Bench-work Mapping - 2013 (PDF) so I have some reference
points for documentation. Not sure if this is overkill - we shall see. I also spent too much money on
eBay!
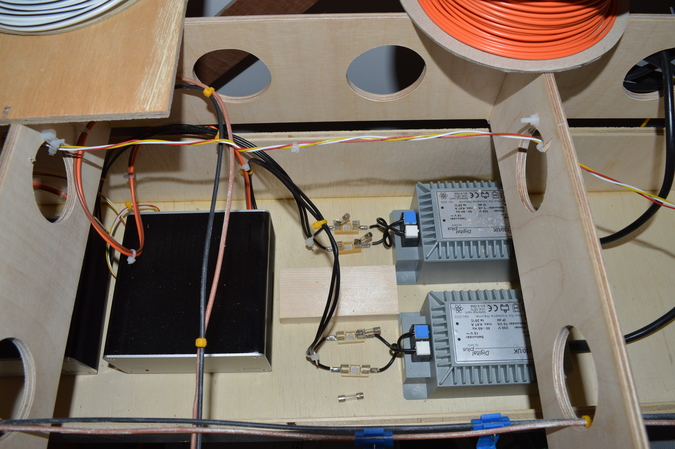
Trays
I built three suspended trays to take the transformers and Lenz power stations. There should be enough
room for some more power supplies later.

Click on picture for full size 8.2MB photo.
Click on picture for full size 9.3MB photo.

Click on picture for full size 9.5MB photo.
Buses
Laid in the power, control, feedback and XpressNet buses.
I bought some Blue Scotchloks for the power bus (Lenz J & K wires) and some Red Scotchloks for
ancillary power distribution.
July 2013
Flaps
After looking on the internet at other peoples layout of the electronics, I decided I would try adding
some drop down flaps under the bench-work squares. I found some 1 inch hinges, magnetic catches and
nylon bolts on eBay and experimented. More information can be seen here
Track Power
Finally two TR150 transformers and Lenz LV102s arrived. Mounted and wired transformers to the LV102s
and connect the U & J connections to the power buses. As a reminder, my wiring specs
August 2013
Design
I still don't have a complete design plan yet, I bought a 20M roll of 1200 gauge lining paper (for
walls) from Wickes and have started cutting out some templates for the Peco set track and some of the
stations and buildings.
This web site
6th - I have just started a redesign using CSS style sheets. I hadn't figured on so many
changes to the Perl code and what needed to be done with a fixed width pages. Getting there slowly with
a few exceptions. I have changed the site to use a base
tag in the header and changed all links
to be relative to that. The more I use it the more I regret that change and wish I had left the links
relative.
Purchases
11th - I got carried away on eBay and bought four locos and 3 carriages at a good prices and
so I treated myself to a Brawa 6560 - Schauinsland Cable Car Pack, a Brawa 6570 - Schauinsland
Buildings Pack. two Brawa 6212 - masts, two Brawa 6562 - Blue cars and two Brawa 6561 - Red cars.
That's this months budget blown!
Wow, just had another spending spree on eBay and bought 2 locos and 22 wagons.
Note to self: stop spending money!
More Purchases
19th - I have just published this site on the internet, carried out many W3C checks and made
many recommended non visible updates to the web pages.
As a self congratulatory present, I just had another eBay spending spree buying 2 more locos and 40 wagons.
Note to self: stop spending money! (deja vu?)
22nd - I have also updated the web site with several new wagons and a couple of engines. I have also added some photographs which can be seen further up this page.
September 2013
Site Update
![[writing]](/images/writing.gif) 20th - Changed the
underlying navigation structure and CSS, but left (almost) the same appearance, and resized images from
the masters using ImageMagick
20th - Changed the
underlying navigation structure and CSS, but left (almost) the same appearance, and resized images from
the masters using ImageMagick
More Purchases
24th - Ordered some Craftfoam Blue from Panel Systems (updated 2018) and some Woodland Scenics 3% (ST1416) and
4% (ST1411) inclines from Hattons.
I also bought two Mini Photo Lights, Stands and bulbs for the camera as well as a mini tripod and two 32Gb memory cards. After all, it's about time I started taking some pictures of the models.
October 2013
Site Update
3rd - Added the Models database table to include the model kits I have previously built.
Like the other databases it is only partially populated. I should also say that the kits were built and
the photographs taken in 2003 and not 2013!!
November 2013
 Having had October off doing nothing
except shuffling junk in the various rooms of the house, I suppose I had better start doing something.
So let's start with the first station positioning...
Having had October off doing nothing
except shuffling junk in the various rooms of the house, I suppose I had better start doing something.
So let's start with the first station positioning...